最近要开发一个微信小游戏,本人在这方面是一窍不通,先找了微信小游戏官方的一个demo,学习一下.
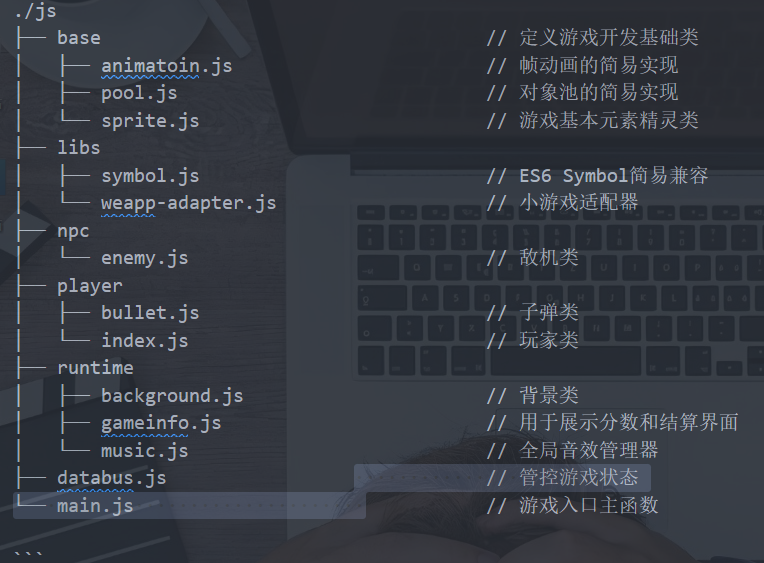
目录分析 README.md中有详细的介绍,我们来看一下.
这里其实漏掉了一个game.js. game.js是小游戏的入口文件. 他实例化了Main()
1 2 3 4 5 6 7 import './js/libs/weapp-adapter' import './js/libs/symbol' import Main from './js/main' new Main()
接下来,我们来分析飞机大战的主要文件.
main.js main是游戏主函数.是这个游戏的核心.在分析main.js之前,我们先来了解一些基础知识.
基础知识
帧:在视频 领域,电影 、电视 、数字视频 等可视为随时间连续变换的许多张画面,其中帧 是指每一张画面。
帧数:帧数(Frames),为帧生成数量的简称。由于口语习惯上的原因,我们通常将帧数与帧率 混淆。每一帧都是静止的图象,快速连续地显示帧便形成了运动的假象,因此高的帧率可以得到更流畅、更逼真的动画。其实,我们所看的动画,就是所谓的动态画面,电影,电视,动漫,就是一幅幅画面按照顺序叠加起来的,像50帧就是一秒50帧,代表一秒钟会有50张画面.
精灵:是游戏中的一个基本概念,指的是在游戏中的一个基本物体或动画或贴图,如NPC或者敌人,在本游戏中有子弹,敌机和玩家
回调函数:在特定事件发生后,由事件方进行调用的函数
画布:顾名思义就是使用了画东西的地方,其实就是用于渲染相关内容的位置
接下来,我们看一下main.js中各个方法,代码中夹杂了我自己写的一些注释,帮助我们更好的理解.
contructor()和restart() contructior()是一个构造函数,用于创建main对象的,他里面调用了restart方法,我们着重看一下restart方法.
restart主要负责生产一个界面,初始化各类信息.
1
2
3
4
5
6
7
8
9
10
11
12
13
14
15
16
17
18
19
20
21
22
23
24
25
26
restart() { databus.reset(); canvas.removeEventListener( "touchstart" , this .touchHandler ); this .bg = new BackGround(ctx); this .player = new Player(ctx); this .gameinfo = new GameInfo(); this .music = new Music(); this .bindLoop = this .loop.bind(this ); this .hasEventBind = false ; window .cancelAnimationFrame(this .aniId); this .aniId = window .requestAnimationFrame( this .bindLoop, canvas ); }
enemyGenerate() enemyGenerate()作用就是生成敌机
1 2 3 4 5 6 7 8 9 10 11 12 13 14 15 16 17 18 19 20 21 22 23 24 25 26 27 28 29 30 31 32 33 34 35 36 37 38 39 40 41 42 43 44 45 46 47 48 49 50 enemyGenerate() { if (databus.frame % 30 === 0 ) { const enemy = databus.pool.getItemByClass("enemy" , Enemy); enemy.init(8 ); databus.enemys.push(enemy); } } collisionDetection() { databus.bullets.forEach((bullet ) => { for (let i = 0 , il = databus.enemys.length; i < il; i++) { const enemy = databus.enemys[i]; if (!enemy.isPlaying && enemy.isCollideWith(bullet)) { enemy.playAnimation(); this .music.playExplosion(); bullet.visible = false ; databus.score += 1 ; break ; } } }); for (let i = 0 , il = databus.enemys.length; i < il; i++) { const enemy = databus.enemys[i]; if (this .player.isCollideWith(enemy)) { databus.gameOver = true ; break ; } } }
touchEventHandler() 游戏结束后判断是否重新开始
1 2 3 4 5 6 7 8 9 10 11 12 13 14 15 16 17 18 touchEventHandler(e) { e.preventDefault(); const x = e.touches[0 ].clientX; const y = e.touches[0 ].clientY; const area = this .gameinfo.btnArea; if ( x >= area.startX && x <= area.endX && y >= area.startY && y <= area.endY ) this .restart(); }
render() render()是用于渲染场景,用于每次修改内容后重新渲染场景内容(每一帧调用)
1 2 3 4 5 6 7 8 9 10 11 12 13 14 15 16 17 18 19 20 21 22 23 24 25 26 27 28 29 30 31 32 33 34 35 36 37 38 39 40 41 42 43 44 render() { ctx.clearRect(0 , 0 , canvas.width, canvas.height); this .bg.render(ctx); databus.bullets.concat(databus.enemys).forEach((item ) => { item.drawToCanvas(ctx); }); this .player.drawToCanvas(ctx); databus.animations.forEach((ani ) => { if (ani.isPlaying) { ani.aniRender(ctx); } }); this .gameinfo.renderGameScore(ctx, databus.score); if (databus.gameOver) { this .gameinfo.renderGameOver(ctx, databus.score); if (!this .hasEventBind) { this .hasEventBind = true ; this .touchHandler = this .touchEventHandler.bind(this ); canvas.addEventListener("touchstart" , this .touchHandler); } } }
update() 1 2 3 4 5 6 7 8 9 10 11 12 13 14 15 16 17 18 19 20 21 22 23 update() { if (databus.gameOver) return ; this .bg.update(); databus.bullets.concat(databus.enemys).forEach((item ) => { item.update(); }); this .enemyGenerate(); this .collisionDetection(); if (databus.frame % 20 === 0 ) { this .player.shoot(); this .music.playShoot(); } }
loop() 1 2 3 4 5 6 7 8 9 10 11 12 13 14 15 loop() { databus.frame++; this .update(); this .render(); this .aniId = window .requestAnimationFrame( this .bindLoop, canvas ); }
这就是main.js的主要内容,接下来我们看一下databus.js
databus.js databus.js是一个全局状态管理器.databus的作用是检测全局状态,回收敌机和子弹,那么什么是回收?什么是对象池?
首先我们要知道敌机或是子弹这种频繁出现的东西,虽然都是基于同一个对象,但每一个物体在使用的时候都需要单独开辟空间,如果使用后不回收的话就会非常浪费空间,而这时我们就会用到池,这个池简单来说就是一个容器,用来存放子弹或敌机对象,当我们需要一个子弹或是一个敌机时,就从池中取,位置速度重新初始化一下就可以了。不需要了,再放回池中。constructor() 我们来看一下 constructor()做了什么.
1 2 3 4 5 6 7 8 9 10 11 12 13 14 15 16 17 18 constructor () { if (instance) return instance instance = this this .pool = new Pool() this .reset() }
reset() 1 2 3 4 5 6 7 8 reset() { this .frame = 0 this .score = 0 this .bullets = [] this .enemys = [] this .animations = [] this .gameOver = false }
removeEnemey() 1 2 3 4 5 6 7 8 9 10 11 12 13 removeEnemey(enemy) { const temp = this .enemys.shift() temp.visible = false this .pool.recover('enemy' , enemy) }
removeBullets()
1 2 3 4 5 6 7 8 9 10 11 removeBullets(bullet) { const temp = this .bullets.shift() temp.visible = false this .pool.recover('bullet' , bullet) }
现在,我们一起来看一下敌机类(enemy.js)
enemy.js enemy用于生成敌机。它继承了Animation类,引入了databus,实例化了databus
rnd() 1 2 3 4 5 6 7 8 9 10 11 12 13 14 15 16 17 const __ = { speed: Symbol ("speed" ), }; const databus = new DataBus();function rnd (start, end ) return Math .floor(Math .random() * (end - start) + start); }
constructor() 1 2 3 4 5 6 7 constructor () { super (ENEMY_IMG_SRC, ENEMY_WIDTH, ENEMY_HEIGHT); this .initExplosionAnimation(); }
init() 1 2 3 4 5 6 7 8 9 10 11 12 init(speed) { this .x = rnd(0 , window .innerWidth - ENEMY_WIDTH); this .y = -this .height; this [__.speed] = speed; this .visible = true ; }
initExplosionAnimation() 1 2 3 4 5 6 7 8 9 10 11 12 13 14 15 16 17 18 19 initExplosionAnimation() { const frames = []; const EXPLO_IMG_PREFIX = "images/explosion" ; const EXPLO_FRAME_COUNT = 19 ; for (let i = 0 ; i < EXPLO_FRAME_COUNT; i++) { frames.push(`${EXPLO_IMG_PREFIX + (i + 1 )} .png` ); } this .initFrames(frames); }
update() 1 2 3 4 5 6 7 8 9 update() { this .y += this [__.speed]; if (this .y > window .innerHeight + this .height) databus.removeEnemey(this ); }
再来瞅瞅我们的子弹类(bullet.js)
bullet.js bullet继承了sprite(精灵类),实例化了databus(). bullet.js代码比较少,我直接贴上来,来分析一下.重点看update方法.
1 2 3 4 5 6 7 8 9 10 11 12 13 14 15 16 17 18 19 20 21 22 23 24 25 26 27 28 29 30 31 32 33 34 35 36 37 import Sprite from "../base/sprite" ;import DataBus from "../databus" ;const BULLET_IMG_SRC = "images/bullet.png" ;const BULLET_WIDTH = 16 ;const BULLET_HEIGHT = 30 ;const __ = { speed: Symbol ("speed" ), }; const databus = new DataBus();export default class Bullet extends Sprite constructor () { super (BULLET_IMG_SRC, BULLET_WIDTH, BULLET_HEIGHT); } init(x, y, speed) { this .x = x; this .y = y; this [__.speed] = speed; this .visible = true ; } update() { this .y -= this [__.speed]; if (this .y < -this .height) databus.removeBullets(this ); } }
看一下我们的玩家类(index.js)
index.js player 同样继承了sprite,实例化了databus.敌机,子弹,玩家,都用到了databus中的一些属性或方法.
constructor() 1 2 3 4 5 6 7 8 9 10 11 12 13 14 15 constructor () { super (PLAYER_IMG_SRC, PLAYER_WIDTH, PLAYER_HEIGHT); this .x = screenWidth / 2 - this .width / 2 ; this .y = screenHeight - this .height - 30 ; this .touched = false ; this .bullets = []; this .initEvent(); }
checkIsFingerOnAir() 1 2 3 4 5 6 7 8 9 10 11 12 13 14 15 16 17 checkIsFingerOnAir(x, y) { const deviation = 30 ; return !!( x >= this .x - deviation && y >= this .y - deviation && x <= this .x + this .width + deviation && y <= this .y + this .height + deviation ); }
setAirPosAcrossFingerPosZ() 1 2 3 4 5 6 7 8 9 10 11 12 13 14 15 16 17 18 19 setAirPosAcrossFingerPosZ(x, y) { let disX = x - this .width / 2 ; let disY = y - this .height / 2 ; if (disX < 0 ) disX = 0 ; else if (disX > screenWidth - this .width) disX = screenWidth - this .width; if (disY <= 0 ) disY = 0 ; else if (disY > screenHeight - this .height) disY = screenHeight - this .height; this .x = disX; this .y = disY; }
initEvent() 1 2 3 4 5 6 7 8 9 10 11 12 13 14 15 16 17 18 19 20 21 22 23 24 25 26 27 28 29 30 31 32 33 34 35 36 37 initEvent() { canvas.addEventListener("touchstart" , (e) => { e.preventDefault(); const x = e.touches[0 ].clientX; const y = e.touches[0 ].clientY; if (this .checkIsFingerOnAir(x, y)) { this .touched = true ; this .setAirPosAcrossFingerPosZ(x, y); } }); canvas.addEventListener("touchmove" , (e) => { e.preventDefault(); const x = e.touches[0 ].clientX; const y = e.touches[0 ].clientY; if (this .touched) this .setAirPosAcrossFingerPosZ(x, y); }); canvas.addEventListener("touchend" , (e) => { e.preventDefault(); this .touched = false ; }); }
shoot() 1 2 3 4 5 6 7 8 9 10 11 12 13 shoot() { const bullet = databus.pool.getItemByClass("bullet" , Bullet); bullet.init(this .x + this .width / 2 - bullet.width / 2 , this .y - 10 , 10 ); databus.bullets.push(bullet); }
接下来,看一下很重要的动画类(Animation)
Animation.js animation.js就是所有动画所在的文件,他继承了spirit类,我们来看看他具体做了什么.
1 2 3 4 5 6 7 8 9 10 11 12 13 14 15 16 17 18 19 20 import Sprite from './sprite' import DataBus from '../databus' const databus = new DataBus()const __ = { timer: Symbol ('timer' ), }
constructor() 1 2 3 4 5 6 7 8 9 10 11 12 13 14 15 16 17 18 19 20 21 22 23 24 25 26 27 28 29 30 31 constructor (imgSrc, width, height) { super (imgSrc, width, height) this .isPlaying = false this .loop = false this .interval = 1000 / 60 this [__.timer] = null this .index = -1 this .count = 0 this .imgList = [] databus.animations.push(this ) }
initFrames() 1 2 3 4 5 6 7 8 9 10 11 12 13 14 15 16 initFrames(imgList) { console .log(imgList); imgList.forEach((imgSrc ) => { const img = new Image() img.src = imgSrc this .imgList.push(img) }) this .count = imgList.length }
aniRender() 1 2 3 4 5 6 7 8 9 10 11 aniRender(ctx) { ctx.drawImage( this .imgList[this .index], this .x, this .y, this .width * 1.2 , this .height * 1.2 ) }
playAnimation() 1 2 3 4 5 6 7 8 9 10 11 12 13 14 15 16 17 18 19 20 21 22 playAnimation(index = 0 , loop = false ) { this .visible = false this .isPlaying = true this .loop = loop this .index = index if (this .interval > 0 && this .count) { this [__.timer] = setInterval( this .frameLoop.bind(this ), this .interval ) } }
stop() 1 2 3 4 5 6 7 stop() { this .isPlaying = false if (this [__.timer]) clearInterval(this [__.timer]) }
frameLoop() 1 2 3 4 5 6 7 8 9 10 11 12 13 14 15 frameLoop() { this .index++ if (this .index > this .count - 1 ) { if (this .loop) { this .index = 0 } else { this .index-- this .stop() } } }
回顾一下,这几个文件都继承或引入了sprite,那我们就来看看这个精灵类,它具体做了哪些事情.
sprite.js 代码不多,我直接贴上来,代码中同样夹杂了我自己的一些注释.
1 2 3 4 5 6 7 8 9 10 11 12 13 14 15 16 17 18 19 20 21 22 23 24 25 26 27 28 29 30 31 32 33 34 35 36 37 38 39 40 41 42 43 44 45 46 47 48 49 50 51 export default class Sprite constructor (imgSrc = '', width = 0, height = 0, x = 0, y = 0) { this .img = new Image() this .img.src = imgSrc this .width = width this .height = height this .x = x this .y = y this .visible = true } drawToCanvas(ctx) { if (!this .visible) return ctx.drawImage( this .img, this .x, this .y, this .width, this .height ) } isCollideWith(sp) { const spX = sp.x + sp.width / 2 const spY = sp.y + sp.height / 2 if (!this .visible || !sp.visible) return false return !!(spX >= this .x && spX <= this .x + this .width && spY >= this .y && spY <= this .y + this .height) } }
最后,我们来看一下,pool.js(对象池的简易实现)
pool.js 1 2 3 4 5 6 7 8 9 10 11 12 13 14 15 16 17 18 19 20 21 22 23 24 25 26 27 28 29 30 31 32 33 34 35 36 37 38 39 40 41 42 43 44 45 46 47 48 const __ = { poolDic: Symbol ('poolDic' ) } export default class Pool constructor () { this [__.poolDic] = {} } getPoolBySign(name) { return this [__.poolDic][name] || (this [__.poolDic][name] = []) } getItemByClass(name, className) { const pool = this .getPoolBySign(name) const result = (pool.length ? pool.shift() : new className()) return result } recover(name, instance) { this .getPoolBySign(name).push(instance) } }
总结 整个demo看下来,首先,小游戏就是一个canvas画布.这个游戏,主体就是敌机,子弹和玩家三类 实际上,他们都是一个单独的精灵,在代码中也继承了精灵类,最终才能绘制在canvas上.敌机类不太一样,因为他有一个爆炸效果,所以继承了动画类,做了一个爆炸的帧动画.我们的main游戏主函数,他是主体,它初始化了背景,玩家,游戏信息,音乐等信息,定义了全局的碰撞检测,实现了游戏的帧循环.而databus则是管理全局的状态,包括敌机,子弹,玩家,动画,分数等。对子弹和敌机做了回收操作.
整体调试了几遍代码,在网上也看了相关的分析,算是初步了解了微信小游戏,但对这个demo的理解还是不够深,对一些操作也有点疑问,对微信小游戏感知还是比较模糊.不过,箭在弦上,不得不发了.祝我好运!!!!